Huwebes, Enero 4, 2018


Basic tasks for creating a PowerPoint presentation


PowerPoint presentations work like slide shows. To convey a message or a story, you break it down into slides. Think of each slide as a blank canvas for the pictures, words, and shapes that will help you build your story.
Note: For information about earlier versions of PowerPoint, see Create a basic presentation in PowerPoint.

Choose a theme

When you open PowerPoint, you’ll see some built-in themes and templates. A theme is a slide design that contains matching colors, fonts, and special effects like shadows, reflections, and more.
  1. Choose a theme.
  2. Click Create, or pick a color variation and then click Create.
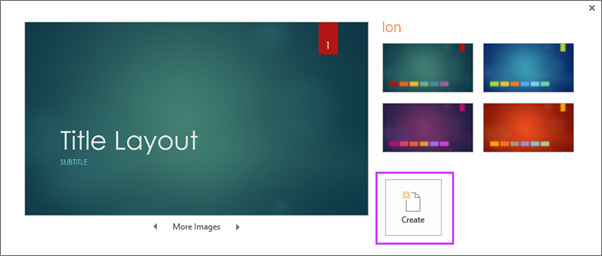
    Shows the Create New presentation from Theme dialog in PowerPoint

Insert a new slide

  • On the Home tab, click the bottom half of New Slide, and pick a slide layout.
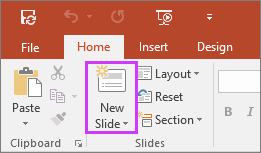
    Shows New Slide button on Home tab of the ribbon in PowerPoint

Save your presentation

  1. On the File tab, choose Save.
  2. Pick or browse to a folder.
  3. In the File name box, type a name for your presentation, and then choose Save.
Note: If you frequently save files to a certain folder, you can ‘pin’ the path so that it is always available (as shown below).
Save your PowerPoint presentation
Tip: Save your work as you go. Hit Ctrl+S often.

Add text

Select a text placeholder, and begin typing.
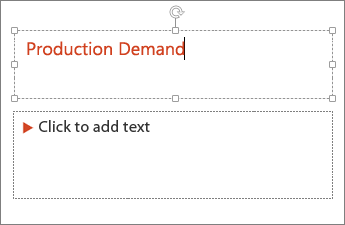
Shows adding text to a text field in PowerPoint

Format your text

  1. Select the text.
  2. Under Drawing Tools, choose Format.
    Shows the Drawing Tools tab on the ribbon in PowerPoint
  3. Do one of the following:
  4. To change the color of your text, choose Text Fill, and then choose a color.
  5. To change the outline color of your text, choose Text Outline, and then choose a color.
  6. To apply a shadow, reflection, glow, bevel, 3-D rotation, a transform, choose Text Effects, and then choose the effect you want.
Read more:

Add pictures

On the Insert tab, do one of the following:
  • To insert a picture that is saved on your local drive or an internal server, choose Pictures, browse for the picture, and then choose Insert.
  • To insert a picture from the Web, choose Online Pictures, and use the search box to find a picture.
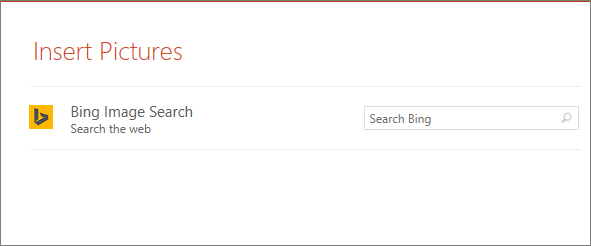
    Insert Pictures dialog in PowerPoint
  • Choose a picture, and then click Insert.

Add speaker notes

Slides are best when you don’t cram in too much information. You can put helpful facts and notes in the speaker notes, and refer to them as you present.
  1. To open the notes pane, at the bottom of the window, click Notes notes button in PowerPoint .
  2. Click inside the Notes pane below the slide, and begin typing your notes.
    Shows the speaker Notes pane in PowerPoint
Read more:

Give your presentation

On the Slide Show tab, do one of the following:
  • To start the presentation at the first slide, in the Start Slide Show group, click From Beginning.
    Shows the Slide Show tab on the ribbon in PowerPoint
  • If you’re not at the first slide and want to start from where you are, click From Current Slide.
  • If you need to present to people who are not where you are, click Present Online to set up a presentation on the web, and then choose one of the following options:


reference: 
https://support.office.com/en-us/article/Basic-tasks-for-creating-a-PowerPoint-presentation-efbbc1cd-c5f1-4264-b48e-c8a7b0334e36


thankyou :)


after OJT kitakits sa school
sleepover kila oppa jay bergonia hehehe

1st reporter kay maam bevs.. oppa group.
libre ng mga may trabaho.. haha
after marosa
mga nakasurvive sa 1st sem.
libre again ng mga may trabaho hahaha
birthday celebration
seminar :)
papawis lang .. 
Image may contain: 4 people, people smiling, people standing, child and indoor
papwis lang again
selfie sa kasal hahaha
keybyang tunnel 
boinding sa Gil n' Mar
bonding sa Star City
after keybyang tunnel foodtrip
naligaw sa auntie ko hahaha
2017 grand alumni home
coming

Fathers Day bonding
activity cowboy attire
pag promote sa pag gamit ng library
art sa hardin
rj serra wins the title 
birthday celebration ni kabatchmate


libre ni kuya noy .. pasyal-pasyal lang


kasal ni kambal anido tedd celebration


Graduation Day .. :)


yan ang mga best araw ko nung 2017 yung mga worst medyo irap lang sa mga gagawin sa school hahahaha naninibago pa aksi e. hirap mag adjust yun lang ..   

Linggo, Disyembre 3, 2017

How to Use Mail Merge in Microsoft Word


Mail Merge is most often used to print or email form letters to multiple recipients. Using Mail Merge, you can easily customize form letters for individual recipients. Mail merge is also used to create envelopes or labels in bulk.
This feature works the same in all modern versions of Microsoft Word: 2010, 2013, and 2016.


Instructions : 


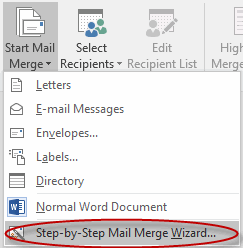
  1. In a blank Microsoft Word document, click on the Mailings tab, and in the Start Mail Merge group, click Start Mail Merge
    Start Mail Merge
  2. Click Step-by-Step Mail Merge Wizard.
    Step-by-Step Mail Merge Wizard

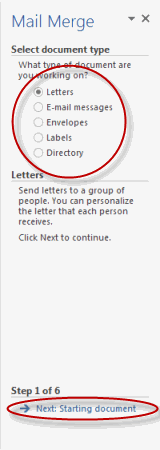
  3. Select your document type. In this demo we will select Letters. Click Next: Starting document
    Select Document Type
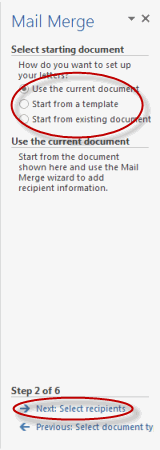
  4. Select the starting document. In this demo we will use the current (blank) document. Select Use the current document and then click Next: Select recipients
    Select Starting Document
    • Note that selecting Start from existing document (which we are not doing in this demo) changes the view and gives you the option to choose your document. After you choose it, the Mail Merge Wizard reverts to Use the current document.
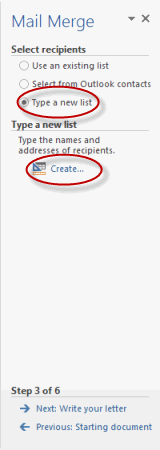
  5. Select recipients. In this demo we will create a new list, so select Type a new list and then click Create
    Select Recipients
    • Create a list by adding data in the New Address List dialog box and clicking OK
      New Address List Dialog Box

    • Save the list.

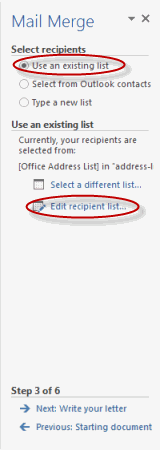
    • Note that now that a list has been created, the Mail Merge Wizard reverts to Use an existing list and you have the option to edit the recipient list.
      Edit Recipient List

    • Selecting Edit recipient list opens up the Mail Merge Recipients dialog box, where you can edit the list and select or unselect records. Click OK to accept the list as is. 
      Mail Merge Recipients Dialog Box
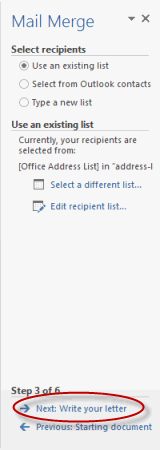
      • Click Next: Write your letter
        Next: Write Your Letter
    • Write the letter and add custom fields.
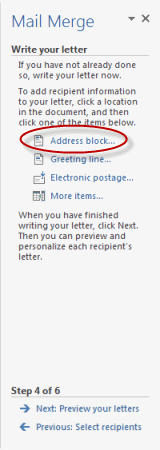
      • Click Address block to add the recipients' addresses at the top of the document. 
        Address Block

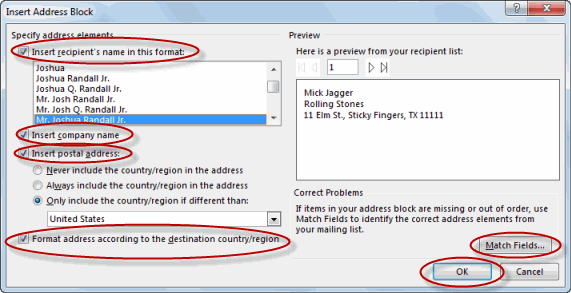
      • In the Insert Address Block dialog box, check or uncheck boxes and select options on the left until the address appears the way you want it to. 
        Insert Address Block Dialog Box
      • Note that you can use Match Fields to correct any problems. Clicking Match Fields opens up the Match Fields dialog box, in which you can associate the fields from your list with the fields required by the wizard. 
        Match Fields Dialog Box

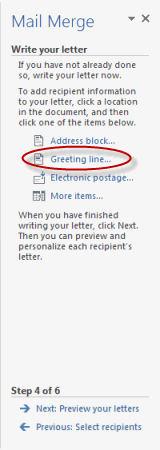
    • Press Enter on your keyboard and click Greeting line... to enter a greeting. 
      Greeting Line

    • In the Insert Greeting Line dialog box, choose the greeting line format by clicking the drop-down arrows and selecting the options of your choice, and then click OK
      Insert Greeting Line Dialog Box

    • Note that the address block and greeting line are surrounded by chevrons (« »). Write a short letter and click Next: Preview your letters
      Chevrons

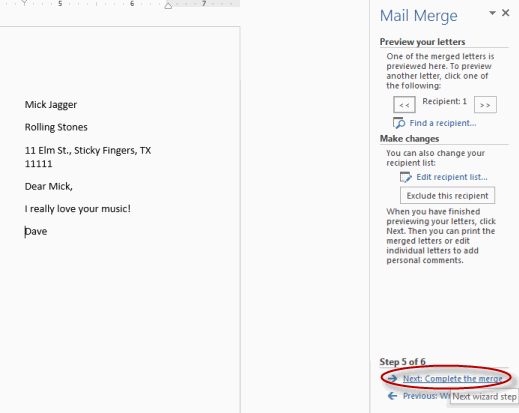
    • Preview your letter and click Next: Complete the merge
      Preview Letter

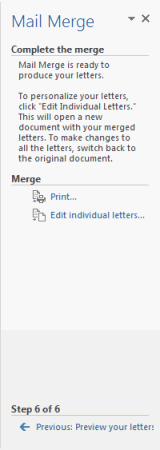
    • Click Print to print your letters or Edit individual letters to further personalize some or all of the letters. 
      Print or Edit


REFERENCE


https://www.webucator.com/how-to/how-use-mail-merge-microsoft-word.cfm


:)


Basic tasks for creating a PowerPoint presentation PowerPoint presentations work like slide shows. To convey a message or a sto...